Not sure how you might feel about this but I hate how some holidays are skipped! Thanksgiving is the first to come to mind and then St. Patrick's Day. Of the few decorations that I have to put out, most are made by me. So I am always on the look out for cute cheap finds. On pinterest last night I found a link for some super cute FREE St. Patty's day artwork. http://pizzazzerie.com/holidays/freebie-st-patricks-day-art-prints/
When I got home from work this afternoon I printed out three of the prints and put them into frames I got at the dollar store. Can't beat $3!
Friday, March 2, 2012
Thursday, March 1, 2012
addicted to hands and feet
From the moment you become pregnant there is one item of advice that you are told over and over: Kids grow up before you know it. I'll be honest, as the months of waiting for my first son crept by slower and slower I thought this was some sort of sick joke. Obviously being on bed rest for most of those nine months didn't help, it still seemed like people were crazy. Now, having not one but three kids of my own, I know that these people are wise beyond their years.
Every day my kids are a little bit bigger and a little less dependant on me. Though I am excited for what each day brings and the new things my kids learn, it makes my heart hurt that I can't keep them sweet, Innocent and safely at my side for ever. It is becuase of this that I think I am obsessed with their hands and feet. It might be a sickness, seriously. On pinterest that is almost the only thing I search...
The best part about having this addiction is that my kids LOVE to finger paint. Adding the feet into the mix is like icing on the cake to them. So as I am pinning projects I want to make I have been hording pieces of wood. Seriously, I have taken wood from dumpsters, garbage cans and (the best place ever) my brother in law Tone's backyard.
Below are two projects that I made for the holidays. They are made so similar to the name blocks http://itsformykid.blogspot.com/2012/03/name-blocks.html that it made it really easy to make. I love when you learn one thing that can be used a hundred different ways!
Follow the instructions from that blog but don't modge podge anything until after you have added footprints or hand prints to the wood and it has completely dried.
I added each child's name to their ghost foot and then put the date on the back of their block. Then I just stapled the ribbon onto the back and BAM, done!
For Thanksgiving I used this wacky font on my cricut and came up with this guy. I added a pumpkin ribbon to this and tied a bow in the middle so that it hung up nicely.
Don't worry I will have many, many more of these projects to come. Right now I am working on doing ocean animals with their hands and feet to go in their bathroom. I can't wait!
name blocks
About a year ago a friend of mine gave me a set of blocks with my last name on it. I fell in love with them and wanted to give them to everyone I knew. What is more perfect for a wedding present than something celebrating their new last name or for a little kids room to display their name.? On etsy they sell for about $4-6 per block which is about $4-6 more than I wanted to pay. Plus, some of them were butt ugly. Sorry if any of you sell these on etsy.
We had a girls craft day and my friend came over and taught all of us how to make them. So here you go....
Materials
3 X 4, 3 X 5,3 X 6 pieces of wood. Any type of wood will work
sand paper
scrapbook paper
modge podge
spray paint or acrylic paint (depends how long you want to wait for it to dry)
paint brush or foam brush
scrapbook paper edge cutter, I like the rounded edge, size small
letters for name: can buy foam, paper or wood ones from craft store or cut out with a cricut machine
stickers or additional embellishments if desired
1. Cut and sand wood. Purchase a 2X8 and cut it into the desired sizes. I like to mix up the sizes. But be creative and do what you like best.
2. Once they are all sanded paint your wood. Make sure to cover all sides and edges
3. As paint is drying get paper and letters ready to modge podge onto wood.
4. Take block and paint a small layer of modge podge onto the front of the block. Place scrapbook paper onto the modge podged block. Smooth the paper out to get all the air bubbles out. This will prevent any bubbles from forming later. Then paint a small layer of modge podge over paper. Place the letter onto the paper and paint another layer of modge podge over letter.
5. Paint all sides of block so that the block. This is especially important if you use a glossy modge podge.
5A. If you are going to do any embellishments add them onto the block before modge podging over the letter
6. Repeat until finished with the name you are doing
DONE! Enjoy your efforts!
The paper I got in the dollar spot at Target. There was enough for 4 of us to make this...
This says Happy Halloween and then I have Christmas paper on the back to reverse for Merry Christmas...I sell Scentsy and this was in my Scentsy stock closet. They smell good to now.
My daughters. Above the a I have a crown sitting on it with jewels. I will update with a closer picture. Her name means queen so she has lots of crowns in her room. It doesn't help that I think she is my princess
If you aren't interested in making these on your own then check out http://www.etsy.com/people/krissybear32. She doesn't have any blocks posted right now but I have seen her stuff at craft shows and they are really cute. Ask if she will send you pictures of her LOVE blocks. She will customize them to match any theme, color, event etc. Kris even adds pictures of your family, or location to the blocks.
wonder under
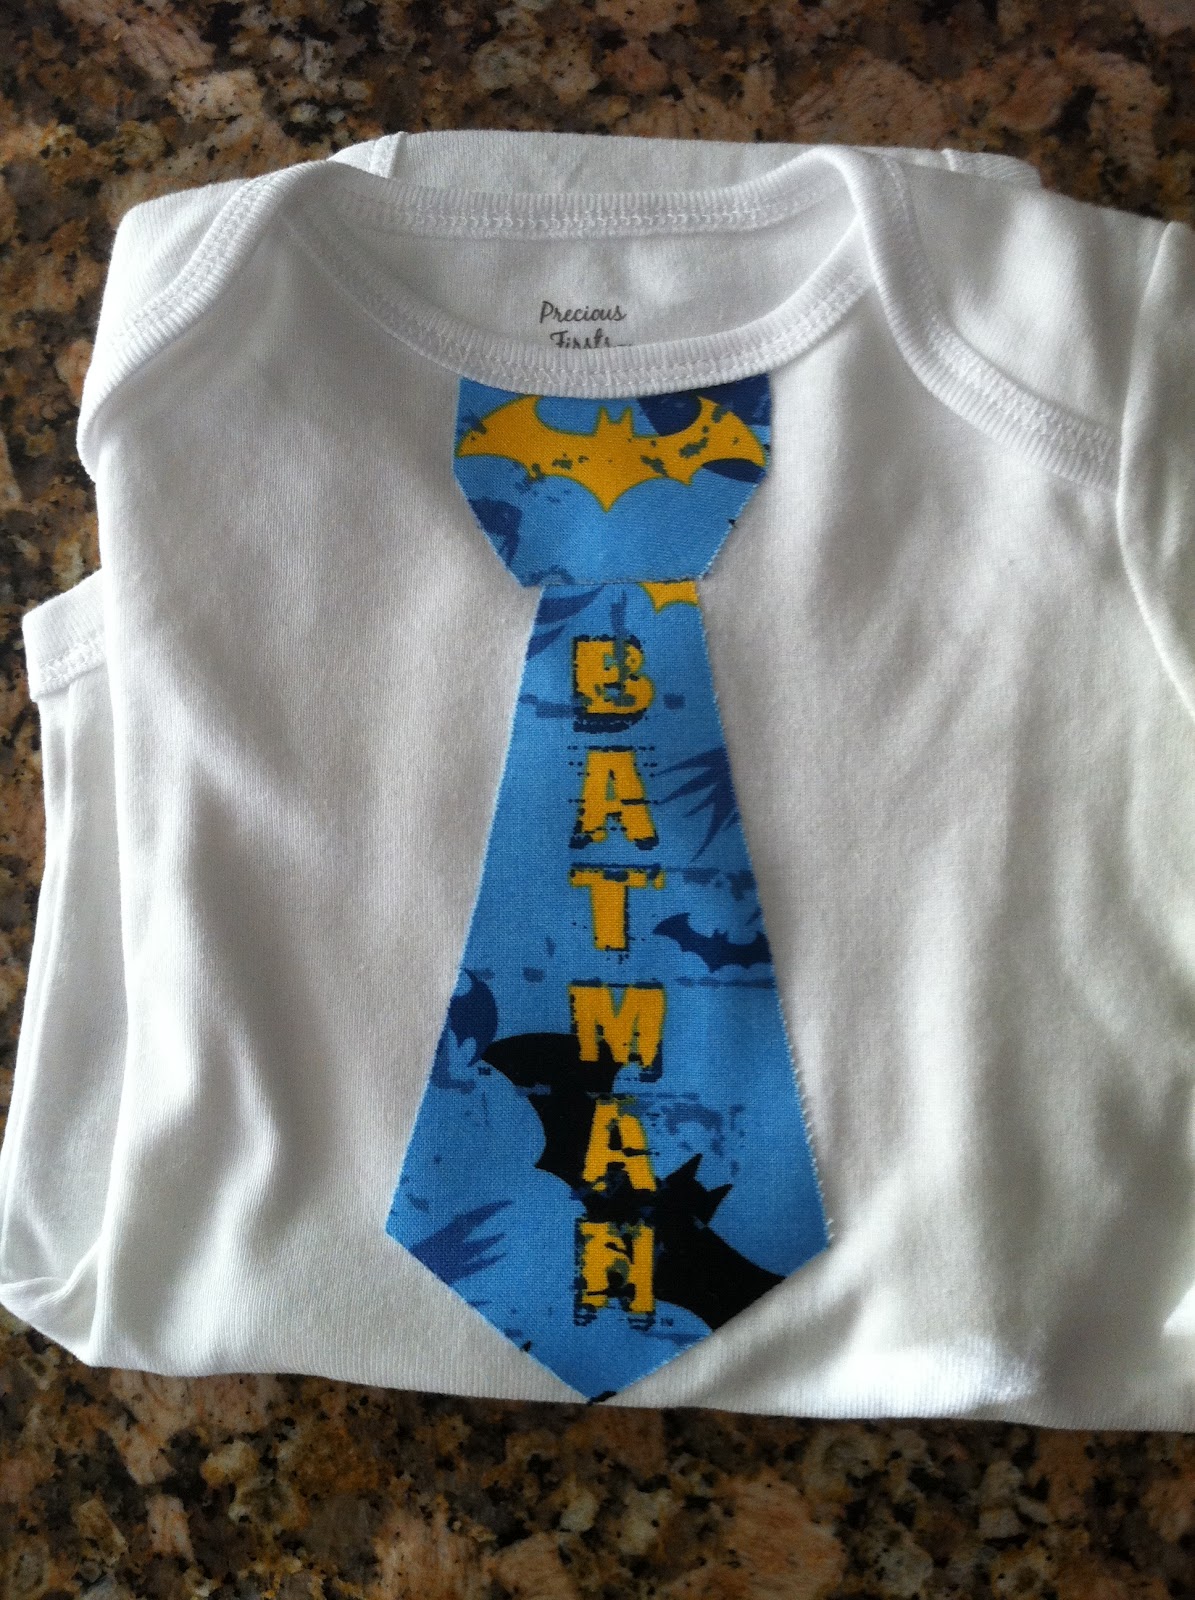
After I posted about the baby shower I thought some of you might be interested in a little more information on how to make the tie onesie. I have tried a few different products to make t-shirts like this. Wonder under seems to be the cheapest and easiest product to make these with. You can get it at most craft and fabric stores. I found mine at JoAnn's for about .75 cents a yard (wait till a holiday and use a coupon off sales items too).
Essentially you decide the shape of the fabric, cut it out, iron one piece of wonder under to the shape, then iron that piece on the desired t-shirt. I think it looks cuter to finish it off by sewing a straight stick around the edge of the fabric. Don't look to close, it is impossible for me to sew straight. The best thing is that no one will notice that because the shirt is so cute!
Here are a few examples....
My son wanted bats. Since the baby shower, and the realization that his Uncle loves batman, it's all he wants these days. I used my cricut and cut out the shape then did the same thing I had done to the cat...
A few months back we went to Disneyland with the kids. These aren't the greatest pictures but they are the best to show you the final outcome. On the Minnie Mouse shirts I added a small bow made out of ribbon to them. I think the you call it tacking. Believe it or not, I am a horrific sewer. But as the blog says It's for my kid, er, kids (that title was taken) so I do it with a lot love if not skill!
You don't have to use a t-shirt either. Try bags, pillowcases, anything!
Essentially you decide the shape of the fabric, cut it out, iron one piece of wonder under to the shape, then iron that piece on the desired t-shirt. I think it looks cuter to finish it off by sewing a straight stick around the edge of the fabric. Don't look to close, it is impossible for me to sew straight. The best thing is that no one will notice that because the shirt is so cute!
Here are a few examples....
This was a shirt dress that I made for my older daughter for halloween. She loves cats. So I googled all sorts of different images till I found one that I liked. Then I printed it out, pinned it to the fabric, cut it out and wonder undered that bad boy to the shirt!
My son wanted bats. Since the baby shower, and the realization that his Uncle loves batman, it's all he wants these days. I used my cricut and cut out the shape then did the same thing I had done to the cat...
A few months back we went to Disneyland with the kids. These aren't the greatest pictures but they are the best to show you the final outcome. On the Minnie Mouse shirts I added a small bow made out of ribbon to them. I think the you call it tacking. Believe it or not, I am a horrific sewer. But as the blog says It's for my kid, er, kids (that title was taken) so I do it with a lot love if not skill!
You don't have to use a t-shirt either. Try bags, pillowcases, anything!
Wednesday, February 29, 2012
a baby shower...
My little sister welcomed a bouncin' baby boy in January. To get her prepared for that bundle of joy my older sister, mother and i threw her a shower. I won't lie. I spent countless hours perusing websites and blogs looking for the cutest ideas and trends for the party. Right now moustache showers are huge. Something about that is just weird to me. First how many women really like JUST a moustache on a man anymore? Give me a nice stubble, scruffy face any day but just a 'stache? No thanks. Then on a website for birthday invitations i saw the cutest invitation! It was of a little boy dressed up as batman (see link below, I of course didn’t take a picture of mine and gave all the leftovers to my sister for her scrapbook). My brother-in-law is an avid comic book reader and his favorite character is batman, perfect! So a theme was born. "http://www.practicallydarlingdesigns.com/superhero-kids-invitation-p-48750.html"
When I get a theme things start to spiral out of control, it becomes an obsession almost. I blame my mother. Since it was close to Halloween my mom found one of those shortbread cookie cutters that had a bat in the pack. I couldn’t resist.
But for those that wanted something more traditional for dessert, cupcakes. I did a funfetti with rainbow chip frosting (my sister’s fav) and a double chocolate chip with oreo buttercream frosting (email me if you are interested in recipe). To stick with the concept, batman rings went on top…
What better way to utilize some of the gifts we got her than to decorate with them...bibs, receiving blankets that I had made with matching burp rags helped to line baskets and some onesies I had made with scraps from the blankets. Cheap, effective and adorable.
My brother-in-law's sister wanted to help out but couldn't make it to the shower. She sent me these really cute custom M&M's. Since no name had been decided we both thought that just baby with the last name was perfect. People loved them and most took a handful home.http://www.mymms.com/utility.aspx
For mother's day last year my mom and husband got me a cricut machine. I bought a Batman cartridge on ebay for $8 and used it to make a "welcome baby colao" sign that had the batman symbol in the middle. My sister took it home and put it above the baby's bed in the nursery.
These I made out of the scraps. I had seen these on etsy and couldn't bring myself to pay $15 for one. The great thing was that since there from scraps it cost me $4 for a pack of three at Carter's outlet AND they had matching blankets with burp cloths.
For the favor I got superhero rubber duckies and cookie and cream hugs. My sister collects rubber duckies. Orient trading has them super cheap. www.orientaltrading.com Then I got ribbon from JoAnn's with a 40% off coupon that said baby boy on it. I ended up spending about 60 cents per favor.
The only other thing that we needed was an activity. My older sister and I have been making name blocks, to documented at a later date. So I thought that might fun to do. Didn't every kid have a set of blocks growing up? I had my mom cut the blocks to the size I wanted and sand them. Then we painted them. so all the guests had to do was modge podge the letters and corresponding animals, items, etc to the blocks....I spent weeks collecting things that corresponded to each letter. By the time we were done Baby C had a full set of alphabet blocks.
A few of the ladies crafting....In the end it was a huge success!
Subscribe to:
Posts (Atom)