Thursday, March 15, 2012

St. Patrick's Day Cupcake

After seeing how cute the St. Patrick Day cookies turned out I thought I would take a spin at turning them into a cupcake.  For full details on how to make the cookies refer to the shamrock cookie recipe.  However I did add a few pictures of the chocolate shamrock.  This time I made the three dots but then I added another dot in the middle and used my lollipop stick to pull the dots together and then dragged the remaining chocolate down to make a stem.  
Then I made chocolate cupcakes.  I didn't have time to make them from scratch so I did a semi-homemade version....recipe below
1 box of dark chocolate cake
1 stick of melted butter (1/2 cup)
1 cup sour cream
1/2 cup water
3 eggs
1 cup of chopped chocolate chips
Pre-Heat oven to 350 and cook for 22 minutes

I made a chocolate frosting to go on top....seriously the best chocolate frosting.  I save the leftovers and put it on graham crackers when I am desperate for a chocolate fix...
2 sticks soft butter (1 cup)
2 cups powdered sugar
2 cups melted chocolate chips
mix on medium speed


 Add on some green sprinkles, the shamrock or the shamrock cookie and you have a fabulous St. Patrick Day treat.  Enjoy!

Wednesday, March 14, 2012

shamrock cookie

I saw these on pinterest Tuesday and decided that they needed to be made.  A girlfriend of mine was coming over with four kids to have a play date with my three kids.  We got out all the needed ingredients and let the kids do everything but melt the chocolate and make the shamrocks. The outcome was pretty miraculous when the 7 kids range in age from 6 to 20 months.  I am sure that yours will turn out much better than our kids did...here is the link for the shamrock recipe from hostess with the mostess....enjoy!


Tuesday, March 13, 2012

dollar store flower petal skirt

I made this dress almost a year ago but every time my daughter wears this dress people ask where I got it.  I thought that I would put the information up here for where I found the instructions on what to do,  dollar store petal skirt.  Since the instructions are for an adult skirt I modified it.  Also, I apologize in advance.  I didn't take pictures of this dress as I was making it.  In my mind I thought it would be a disaster and end up as a Halloween costume or play dress.  

I used my older sons old white t-shirt as the base which worked great.  Then I bought a scrap piece of fabric from the remnants at JoAnn's for the strapless part.  In the back I did a tear drop so there is one button on the top of the dress.  The straps are 1 inch hot pink ribbon that I straight stitched onto the bodice of the dress.  Then i straight stitched the same ribbon between the two pieces of fabric, strapless polka-dot to the flower petal skirt to add length and more color....not bad for my first dress and only $3 for everything I needed. 


 It was freezing when I took this picture, hence the shirt underneath.  But looks super cute with a bolero cardigan...my daughter won't keep a jacket on though....

Monday, March 12, 2012

tooth fairy pillow

I won't lie, I figured I had another year or two before I was going to have to start worrying about teeth falling out.  My son is only 4!  But nature decides when the time is right, and for him, the time is right now.  Just this afternoon another tooth fell out.  The first tooth my mother was kind enough to let us borrow our tooth fairy pillow from my childhood, but now, game face is on.  So this last week our household has been obsessed with teeth!  I found a pillow I loved on mmmcrafts blog.  It was too cute.  But for my kids they would pull the adorable wings off and the little crown  So I decided to take that pillow and merge it with my pillow from my childhood...oh and I put a handle on it, then when it isn't in use it can hang on the side of the bed waiting patiently for the next chomper to fall out.  

Here is what you need to get started.....
2 - 7" x 7" square pieces of fabric
1 - 5" x 5" piece of felt to use as a pocket
1 - small piece of white felt to use for tooth
scraps of other color felt to use for accessorizing tooth 
Scissors
Pinking shears if you want to do a zigzag edge
Sewing machine
Buttons for eyes
Fabric glue
Ribbon if you want to do a handle
Batting

Step 1 - Cut out your fabric into two squares


Step 2 - cut out your felt square, see my trusty old school ruler!  Just make sure you use a light pencil to mark on the felt since it can show through. Also, if you want to cut with pinking shears do so here.
Step 3 - cut out your tooth.  I used the image from the tooth fairy letter.  It can be found here tooth fairy note.  Pin it onto the felt and cut out.

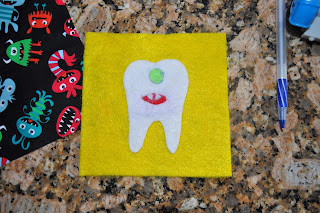
For my son's pillow I used this cool monster fabric so I made him a one eye monster.  I had some left over felt in lime green so I cut out a little circle to put under the button...
Step 4 - fold the tooth in half so that the roots are against each other, long ways and cut out a smile/mouth in a half moon shape.  Then using the fabric glue glue on inside of mouth.  Using scraps leftover from cutting out the tooth I glued on some fangs too.
Step 5 - Glue the tooth monster onto the felt square.  I used a little bit of glue to place the tooth onto the felt.  Then I straight stitched the tooth onto the fabric with the sewing machine.
Step 6 - (this is the one I made for my daughter) Next stitch the felt onto the fabric.  For my son's I used a straight stitch, for my daughter's I used a decorative stitch.

Step 7 - If you want a handle pin your straps onto the right side of fabric then place the other right side of fabric on top of it, my mom always says sandwhich them.  Then sew three sides together.

Step 8 - Fill with batting and then fold the pieces of fabric into each other and stitch that bad boy together!  BAM done!

Monday, March 5, 2012

tooth fairy notes

I looked all over for a cute letter to the tooth fairy.  Two that I found online downloaded a virus onto my computer.  After that I made my own.  First I googled images of the tooth fairy.  I didn't want to have to make my own tooth fairy.  Thankfully I found this adorable tooth fairy.
Then I searched for a tooth.  This one I liked the best for two reasons.  First it had two outlines of a tooth.  In my mind I wanted the tooth to be two tone.  So this would allow me to cut two pieces of paper in different sizes.
For things like this my favorite program to use is Publisher.  It is really easy to use but even better to manipulate images in.  I inserted the tooth and increased it to the size that I wanted.  Then I added the tooth fairy into the tooth and resized that image.  Also, you need to reformat the picture so that you still have the outline.  Then, the hardest part, write the letter.  I wanted it to be cute and fun since my son swallowed his first tooth :(


This was the final product.  I just used a glue stick to attach the two.  I also sprinkled some mac (makeup) pigment that I had in iridescent glitter all over the tooth.  The glitter looks sort of wacky in the picture but on the actual letter it looks fine. 


Where do you stick the money?  Should have thought that through a little bit better....I came up with folding the money into a little bow and then tying a ribbon around it.  I then stapled the ribbon onto the top of the tooth so that it sort of looks like it is on a spring.  Hopefully my son is excited in the morning....

Friday, March 2, 2012

a little st patty's day cheer

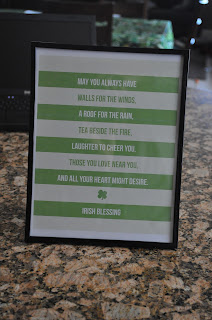
Not sure how you might feel about this but I hate how some holidays are skipped!  Thanksgiving is the first to come to mind and then St. Patrick's Day.  Of the few decorations that I have to put out, most are made by me.  So I am always on the look out for cute cheap finds.  On pinterest last night I found a link for some super cute FREE St. Patty's day artwork.  http://pizzazzerie.com/holidays/freebie-st-patricks-day-art-prints/


When I got home from work this afternoon I printed out three of the prints and put them into frames I got at the dollar store.  Can't beat $3!

Thursday, March 1, 2012

addicted to hands and feet

From the moment you become pregnant there is one item of advice that you are told over and over:  Kids grow up before you know it.  I'll be honest, as the months of waiting for my first son crept by slower and slower I thought this was some sort of sick joke.  Obviously being on bed rest for most of those nine months didn't help, it still seemed like people were crazy.  Now, having not one but three kids of my own, I know that these people are wise beyond their years. 

Every day my kids are a little bit bigger and a little less dependant on me. Though I am excited for what each day brings and the new things my kids learn, it makes my heart hurt that I can't keep them sweet, Innocent and safely at my side for ever.  It is becuase of this that I think I am obsessed with their hands and feet.  It might be a sickness, seriously.  On pinterest that is almost the only thing I search...

The best part about having this addiction is that my kids LOVE to finger paint.  Adding the feet into the mix is like icing on the cake to them.  So as I am pinning projects I want to make I have been hording pieces of wood.  Seriously, I have taken wood from dumpsters, garbage cans and (the best place ever) my brother in law Tone's backyard. 

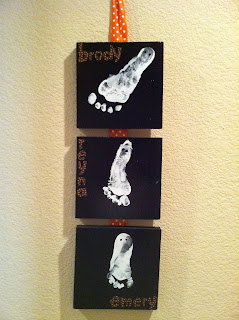
Below are two projects that I made for the holidays.  They are made so similar to the name blocks http://itsformykid.blogspot.com/2012/03/name-blocks.html that it made it really easy to make.  I love when you learn one thing that can be used a hundred different ways!

Follow the instructions from that blog but don't modge podge anything until after you have added footprints or hand prints to the wood and it has completely dried.      


I added each child's  name to their ghost foot and then put the date on the back of their block.  Then I just stapled the ribbon onto the back and BAM, done!
For Thanksgiving I used this wacky font on my cricut and came up with this guy.  I added a pumpkin ribbon to this and tied a bow in the middle so that it hung up nicely.  

Don't worry I will have many, many more of these projects to come.  Right now I am working on doing ocean animals with their hands and feet to go in their bathroom.  I can't wait!

name blocks

About a year ago a friend of mine gave me a set of blocks with my last name on it.  I fell in love with them and wanted to give them to everyone I knew.  What is more perfect for a wedding present than something celebrating their new last name or for a little kids room to display their name.?  On etsy they sell for about $4-6 per block which is about $4-6 more than I wanted to pay.  Plus, some of them were butt ugly.  Sorry if any of you sell these on etsy. 

We had a girls craft day and my friend came over and taught all of us how to make them.  So here you go....

Materials
3 X 4, 3 X 5,3 X 6  pieces of wood.  Any type of wood will work
sand paper
scrapbook paper
modge podge
spray paint or acrylic paint (depends how long you want to wait for it to dry)
paint brush or foam brush
scrapbook paper edge cutter, I like the rounded edge, size small
letters for name: can buy foam, paper or wood ones from craft store or cut out with a cricut machine
stickers or additional embellishments if desired

1. Cut and sand wood.  Purchase a 2X8 and cut it into the desired sizes.  I like to mix up the sizes.  But be creative and do what you like best.

2. Once they are all sanded paint your wood.  Make sure to cover all sides and edges

3. As paint is drying get paper and letters ready to modge podge onto wood.

4. Take block and paint a small layer of modge podge onto the front of the block.  Place scrapbook paper onto the modge podged block.  Smooth the paper out to get all the air bubbles out.  This will prevent any bubbles from forming later.  Then paint a small layer of modge podge over paper.  Place the letter onto the paper and paint another layer of modge podge over letter. 

5.  Paint all sides of block so that the block.  This is especially important if you use a glossy modge podge. 

5A. If you are going to do any embellishments add them onto the block before modge podging over the letter

6. Repeat until finished with the name you are doing

DONE!  Enjoy your efforts!


 For my son's Toy Story room.  Found the stickers in the birthday aisle at Target on clearance for .42 cents!
The paper I got in the dollar spot at Target.  There was enough for 4 of us to make this...


This says Happy Halloween and then I have Christmas paper on the back to reverse for Merry Christmas...I sell Scentsy and this was in my Scentsy stock closet.  They smell good to now.
My daughters.  Above the a I have a crown sitting on it with jewels.  I will update with a closer picture.  Her name means queen so she has lots of crowns in her room.  It doesn't help that I think she is my princess

If you aren't interested in making these on your own then check out http://www.etsy.com/people/krissybear32.  She doesn't have any blocks posted right now but I have seen her stuff at craft shows and they are really cute.  Ask if she will send you pictures of her LOVE blocks.  She will customize them to match any theme, color, event etc.  Kris even adds pictures of your family, or location to the blocks.  

wonder under

After I posted about the baby shower I thought some of you might be interested in a little more information on how to make the tie onesie.  I have tried a few different products to make t-shirts like this.  Wonder under seems to be the cheapest and easiest product to make these with.  You can get it at most craft and fabric stores.  I found mine at JoAnn's for about .75 cents a yard (wait till a holiday and use a coupon off sales items too). 

Essentially you decide the shape of the fabric, cut it out, iron one piece of wonder under to the shape, then iron that piece on the desired t-shirt.  I think it looks cuter to finish it off by sewing a straight stick around the edge of the fabric.  Don't look to close, it is impossible for me to sew straight.  The best thing is that no one will notice that because the shirt is so cute!

Here are a few examples....

This was a shirt dress that I made for my older daughter for halloween.  She loves cats.  So I googled all sorts of different images till I found one that I liked.  Then I printed it out, pinned it to the fabric, cut it out and wonder undered that bad boy to the shirt!  

 My son wanted bats.  Since the baby shower, and the realization that his Uncle loves batman, it's all he wants these days.  I used my cricut and cut out the shape then did the same thing I had done to the cat...


 A few months back we went to Disneyland with the kids.  These aren't the greatest pictures but they are the best to show you the final outcome.  On the Minnie Mouse shirts I added a small bow made out of ribbon to them.  I think the you call it tacking.  Believe it or not, I am a horrific sewer.  But as the blog says It's for my kid, er, kids (that title was taken) so I do it with a lot love if not skill!


You don't have to use a t-shirt either.  Try bags, pillowcases, anything!