I won't lie, I figured I had another year or two before I was going to have to start worrying about teeth falling out. My son is only 4! But nature decides when the time is right, and for him, the time is right now. Just this afternoon another tooth fell out. The first tooth my mother was kind enough to let us borrow our tooth fairy pillow from my childhood, but now, game face is on. So this last week our household has been obsessed with teeth! I found a pillow I loved on mmmcrafts blog. It was too cute. But for my kids they would pull the adorable wings off and the little crown So I decided to take that pillow and merge it with my pillow from my childhood...oh and I put a handle on it, then when it isn't in use it can hang on the side of the bed waiting patiently for the next chomper to fall out.
Here is what you need to get started.....
2 - 7" x 7" square pieces of fabric
1 - 5" x 5" piece of felt to use as a pocket
1 - small piece of white felt to use for tooth
scraps of other color felt to use for accessorizing tooth
Scissors
Pinking shears if you want to do a zigzag edge
Sewing machine
Buttons for eyes
Fabric glue
Ribbon if you want to do a handle
Batting
Step 1 - Cut out your fabric into two squares
Step 3 - cut out your tooth. I used the image from the tooth fairy letter. It can be found here tooth fairy note. Pin it onto the felt and cut out.
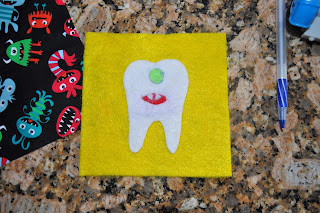
For my son's pillow I used this cool monster fabric so I made him a one eye monster. I had some left over felt in lime green so I cut out a little circle to put under the button...
Step 4 - fold the tooth in half so that the roots are against each other, long ways and cut out a smile/mouth in a half moon shape. Then using the fabric glue glue on inside of mouth. Using scraps leftover from cutting out the tooth I glued on some fangs too.
Step 5 - Glue the tooth monster onto the felt square. I used a little bit of glue to place the tooth onto the felt. Then I straight stitched the tooth onto the fabric with the sewing machine.
Step 6 - (this is the one I made for my daughter) Next stitch the felt onto the fabric. For my son's I used a straight stitch, for my daughter's I used a decorative stitch.
Step 7 - If you want a handle pin your straps onto the right side of fabric then place the other right side of fabric on top of it, my mom always says sandwhich them. Then sew three sides together.
Step 8 - Fill with batting and then fold the pieces of fabric into each other and stitch that bad boy together! BAM done!


No comments:
Post a Comment